Project Setup for Angular App
I recently worked on an AngularJs app. I had not worked on frontend extensively. I had done little bit of javascript and css. So, when I was asked to develop the frontend part of a webapp using AngularJS framework, I decided to learn about AngularJS. I thought I will be able to learn and start work within 2-3 days. It was and under estimate. I realised my mistake and ordered the book AngularJS: Up and Running. I started going through it. It is a good book, gives a good overall concepts of the framework. Finally, once I read most chapters of the book (which I thought would be necessary for my project), I thought I am now ready to develop the project. I kick started and hit the wall, nothing moved. The bookish knowledge is good for writing small programs, testing our knowledge of individual concepts like doing assignments in college. For a professional project, there are other stuff apart from just core program – there are unit tests, there are integration tests, there are builds to be done for the project, then there are delivery/deployment. Even the program is not going to be a simple one single js file having all your components and services. I got completely blocked not knowing what to do. When I searched in Google, it was like asking general recommendation from 10 different random people, each blog/site giving different plugins and different ways of doing it. By this time, probably my senior developer would have figured out my predicament. He setup the project.
The way it was setup was very good. I am saying it very good because I personally felt these things –
- It made me independent. Usually, frontend developer has to wait for the backend to finish their implementation, so that to start the development and test the frontend parts. I could do 95% of the development and testing without waiting for the backend.
- It made my development faster. I had development server and unit test server set. So, I was able to write the code in IDE, view the page in the browser to see how it looks and in another terminal by the time I save the code and swap the desktop, my unit tests results would have shown.
- I was pretty confident of my code. With the unit tests and continuous deployment, it used to surface the error pretty early. I had set up basic integration tests which ran locally.
With this I was very much inspired and thought let me learn these steps of project setup and produce a boilerplate project setup code which would help others and myself in future. I created a dummy project called ExpenseMonitor . The biolerplatecode branch of this project will give you all necessary files and code needed to start a full fledged AngularJS application. Download this project from github and start adding your program logic and test cases.
How to use it?
- Go to my github repo Expense Monitor and download the boilerplatecode branch
- Make sure in your machine nodejs and npm is installed. I used nodejs version 10.
- Go to your local directory where you extracted ExpenseMonitor code.
- Run command npm install -g gulp-cli. This will install gulp-cli globally.
- Finally run npm install. Thats it, it will install all necessary plugins/packages locally within your folder.
- Go and try running
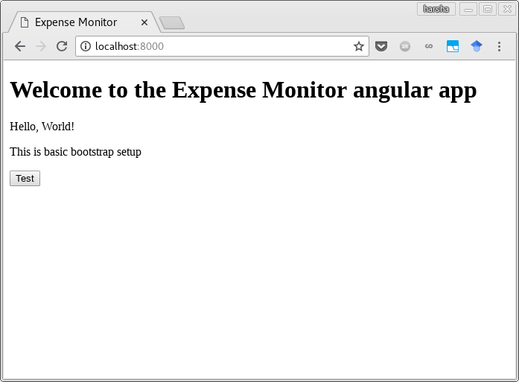
gulp webpack-dev. Open your browser and go to address http://localhost:8000 . And you should see this
Let me explain each plugins I am using and what purpose it serves in the project.
- Gulp – gulp is a toolkit for automating painful or time-consuming tasks in your development workflow, so you can stop messing around and build something . Gulp defines and performs various build activities. Some of the tasks done by gulp are production build, development build, test coverage reports, running unit tests, running integration tests, etc.
- Webpack – Webpack is a static module bundler. It takes all our scripts, html, css and other files and generates the necessary files needed to host in the server. It minifies the scripts, based on the size of the images it either embeds and puts references to those images. The other important use of webpack is it provides a handy dev server which can host your files during development for quick verification of your changes.
- Karma – Karma is a tool which executes your unit tests against the browsers you have configured. I am using jasmine as the framework to write the test cases. It provides a cool feature of watch, which on changes to your code automatically runs your unit tests.
- Protractor – Protractor is an end-to-end testing framework which I am using to write and test our integ tests.
- Travis-CI – Travis is a continuous integration service. Once you integrate your github repo with Travis, it will pull the code and build it everytime there is a checkin to the repo or there is a new branch created.
Now let me go over one by one in little bit detail.
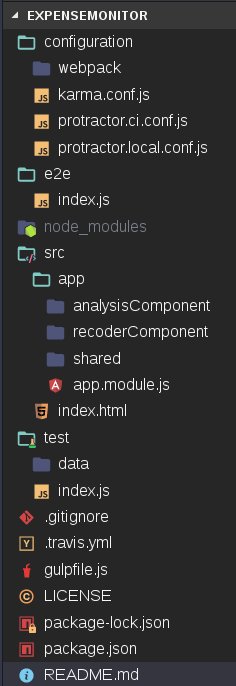
- Project Structure – Keep your project structure as simple as possible. There is no written rule for the way folders and files needs to be arranged but this is what I have done. At the root I have following folders – configuration, src, e2e and test. ‘src’ folder holds all your applications html, js and other static files. ‘configuration’ will hold all the configuration information needed by karma, protractor, webpack and other plugin configurations. ‘test’ folder holds all the unit test js files. ‘e2e’ folder holds all the integration test js files. Inside src folder, there is ‘app’ folder which will have separate folder for each components and a ‘shared’ folder to have all angular js services.
- Gulp – As mentioned gulp helps in build activities. It runs other plugins/packages. In gulp I have defined following tasks
- webpack-dev: This uses webpack plugin and its configuration file webpack.conf.dev to first bundle all your html/css/js files and them host them in webpack dev server. Before you start the development, in the terminal run gulp webpack-dev command. Each time you type something or do some changes to your code, automatically build will happen in your folder and file will be hosted in that dev server. So immediately you can see how your changes behave. You can check your files by going to http://localhost:8000
- webpack-prod: This again uses webpack plugin and its configuration file webpack.conf.prod . It bundles the code in the most efficient way possible that is converts your javascript code into minified version. Then finally generates the distribution files in the dist folder. If you see there will be two files index.html and other one is main.js file. Even if you had 10 or 20 js files, this would convert them into a single js file. If you try to read that file, it would be very cryptic as the contents of your js file have been minified. So these files you need to take and host in your web server. To run this task
gulp webpack-prod - karma-test: This uses the karma tool to run the unit tests. This runs the unit test only once per call. To call this task run
gulp karma-test. It uses the karma server and karma.conf.js file for running the unit tests. - clean: As the name suggests, this task cleans up all the build and release files. It deletes these folders as part of clean up – dist, coverage, node_modules and build. To run run this task
gulp clean. - karma-watch: This is same as karma-test but this one runs continuously. It keeps watch on your files. Moment you do the changes (save the file), it will run all the unit tests and display the results. So I would recommend to run this in separate terminal along with webpack-dev during your development. To run this, execute
gulp karma-watch. - print-coverage: The coverage of your unit tests as in how much part of your code does your unit tests actually test gives a good understanding of how much trust or confident we have about our code. As part of the karma, we are running coverage tool. So we have to first run karma-test or karma-watch tasks before running this task. Coverage tool generates webased report as well as text file based report. These reports are generated in folder coverage. This task reads the text file report and prints in the console. It gives how much percentage of branches, statements, lines and functions have been covered by our tool. To run it,
gulp print-coverage - web-show-coverage: As explained above, as part of unit test run we are generating both text file based coverage report as well as web based html reports. This task opens up default browser and then displays those web html based coverage reports. this is much more interactive and much more detailed when compared to just text based report. To run this use
gulp web-show-coverage - webdriver-update: The protractor uses selenium drivers to run its tests. This task uses gulp-protractor package to download the latest selenium jars and browser drivers like chrome drivers needed to run protractor and selenium server. Usually before starting the protractor tests, this task has to be run.
gulp webdriver-updatecommand is used to execute this task. - webdriver-standalone: This will execute and start the selenium server needed by the protractor. This again internally uses gulp-protractor package. Once webdriver-update is executed, next step would be running this standalone server. Use
gulp webdriver-standalonecommand to run this task. - protractor-local: This uses protractor to run our integ tests. To execute this task we need to run gulp protractor-local. Before running this, we need to start the selenium server and our own product server. Then only we can run this task. So the order of execution would be webdriver-update, webdriver-standalone, webpack-prod, local-app-host and then finally
gulp protractor-local. - local-app-host: This uses the express package to run a nodejs server and host our frontend web app files. So first we need to run webpack-prod which produces the distributable files in dist folder. Then when we run this task, it will host those files present in dist folder. To execute this task run
gulp local-app-host. You can we the files by going to http://localhost:8080 - webdriver: This is just the combination of webdriver-update and webdriver-standalone tasks. It is used to download latest selenium jars and start the selenium server. To execute this task, run
gulp webdriver.
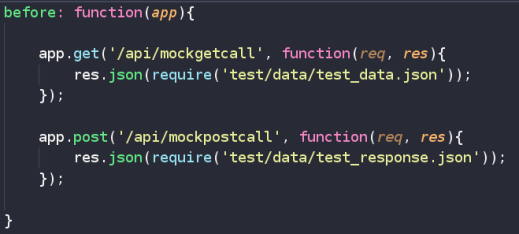
- Webpack: webpack as mentioned earlier is used for two tasks – bundling and then webdev server. Webpack uses configuration to bundle the files. These configuration can be found in configuration/weback folder. Webpack internally uses different plugins or loaders to handle different types of files like html, js, css, png, etc. This will generate index.html as specified by the HtmlWebpackPlugin, main.js based on different different loaders and finally main.css as specified by MiniCssExtractPlugin if any css file exists. These contain the general/common configuration applicable to dev code and production code. So it is placed in webpack.common.js file. The dev specific configuration is found in webpack.dev.js and production specific configuration can be found in webpack.prod.js. Only thing that varies between both of them are mode & source map. More information about this can be found in webpack website. Apart from bundling, another important usage is webpack dev server. Remember, in the code given there is no actual call going back to backend. As you develop, you need to make backend calls. Then each such call has to be handled by this dev server, basically mocking those backend calls. This is the key to your independence from backend development. Below image provide some example of mocking your backend calls. This is added in webpack-dev section of the gulpfile.
- Karma: As I mentioned earlier, Karma is the tool to run our unit tests. The framework used to write the unit test is jasmine. Jasmine is used for writing behavior based testing. Karma supports other unit testing fameworks as well like mocha. All the configuration related to karma is mentioned in configuration/karma.conf.js file. We can add individual test/spec files containing your unit tests to the configuration file unders ‘files‘ section or add one file and let that file get other unit test files using require. It can run these tests on multiple browsers. I have configured for phantomjs and chrome browser. Phantomjs is a light weight headless (no GUI) browser mainly used for testing. For each browser you want to test, you need to add respective plugins (karma-phantomjs-launcher, karma-chrome-launcher). Again we are using webpack for bundling the files which in turn will be used by karma. Then we are using code coverage tool to find how much percentage of code is actually covered by unit tests. So both webpack and coverage tool (Istanbul) will be run as preprocess activity. By default we are saying autowatch as false and single run as true. That is run the test only once and don’t watch on the state of files, so no need to run automatically when there is any change to files. But these settings will be modified in gulp when we run karma-watch command.
- Protractor: As mentioned early, this is for integ tests. Ideally, you first host your full application in a web server. Then use protractor to run tests for that address. But during the development, we want to be independent of the backend development. So we mock the backend server and host it in a local node server. This hosting is done via express package. Similar to webpack dev server, if you have backend calls mock those calls in the gulp local-app-host section. The protractor configuration is found in configuration/protractor.local.conf.js file. Protractor has the ability to run tests in multiple browsers at the same time. If you see in the configuration file under multiCapabilities, I have only configured chrome browser. You can do firefox, edge, safari, etc. Phantomjs support has been discontinued. If you run the protractor, you can see chrome browser opened, then it loads our pages and tests as if a human is operating. It is all visual. Similar to phantomjs we can run chrome in headless mode (No GUI). It needs certain extra configuration. The other important configuration being set is the selenium address. When you run webdriver-standalone, it will start the selenium server. In the console it prints the address where the server is running. Note down that in the configuration file. In the gulp protractor-local we are specifying the address, where our application is hosted as baseUrl to the protractor. So inside your integ tests you can use browser.baseUrl to get the address and no need to hardcode the address in your tests. Similar to Karma unit tests, have multiple js files for different functionality but all these are loaded using a single index.js file. And this file is provided as source test file for the protractor in protractor-local gulp task. In the production environment, we use saucelabs which provide fleet of browsers/machines and selenium servers instead of we hosting them as localhost. Each browser from different machines will hit our production deployment. I am working on integrating saucelabs but it might take sometime.
- TravisCI: It is important to have continuous build and deployments to surface out the problems encountered in production environment very early. .travis.yml file holds the configuration and steps that the travis needs to take care when it builds the code. Travis first sets up a docker, pulls the code and installs the software as prescribed in the yml file, runs the scripts as mentioned in the travis.yml. As I am using chrome for my testing in karma, I need to have chrome installed in the docker before executing any tasks. So in the addons section I am mentioning chrome. As this is a node.js application, I need all the necessary packages of node.js installed with version 10. Setting up node_modules directory is time consuming. It holds all the node package files needed by my application. I am telling travis to cache it out, as in once setup donot clear it. Then before running our scripts, I am asking to start virtual desktop (xvfb start) and install gulp-cli node package globally. Finally run npm install which will download all the node plugins/packages as mentioned in package.json/package-lock.json file and sets up node_modules folder. Then do the build, followed by running unit tests. If successful then cleanup everything and produce the production ready artifacts.
I know its a lot but all the work is done and placed in the github repo. All you need to do it download code put your logic into it and put your unit test cases into it. Rest of the build release work is already done for you. Hope it helps! Happy coding!